Hello Optimism
For developers who have never done blockchain development before, getting started might seem complex. It’s different from learning a programming language because it involves many concepts like blockchain networks, smart contracts, wallets, transactions, and more. However, we believe that with a learning mindset, you can quickly get started. We’ve prepared a simple tutorial to help you understand the basics of blockchain and how to interact with blockchain networks using GDWeb3. We hope this tutorial helps you get started quickly. We call this tutorial Hello Optimism (because we use the Optimism network), just like the classic Hello World.
1. Preparation
A blockchain network is a decentralized network consisting of many P2P nodes, each running independently. These nodes communicate through agreed-upon protocols to reach consensus and maintain data called the blockchain. If you don’t fully understand these technologies, that’s okay. You can think of it as the server part in network game development. The difference is that this server is completely public, its contents are maintained collectively, and everything is visible to everyone. When using it, we pay fees (Gas) for each operation we perform on this server.
Therefore, we need two key things to start development:
A blockchain network for testing
Test tokens
Let’s prepare these two things.
1.1. Blockchain Network
In this tutorial, we use the Optimism test network. Optimism is an ETH Layer 2 solution with excellent performance and a robust ecosystem. You can learn more about Optimism in the Optimism official documentation.
There are typically three ways to prepare the Optimism test network:
Use the official public test network
Set up a local node and build a local test network
Use test networks provided by third-party service providers like QuickNode, Infura, Alchemy, etc.
Here we’ll use the first method - the official public test network.
For this, you’ll need a MetaMask wallet and switch to the Optimism test network (note: while MetaMask isn’t mandatory, it has a user-friendly interface that helps with quick learning and understanding various operations, which is why we’re using it). We’ll use the browser plugin version of MetaMask, and this tutorial uses Google Chrome.
For more information about MetaMask, please refer to: https://metamask.io/faqs/
1.1.1. Installing MetaMask
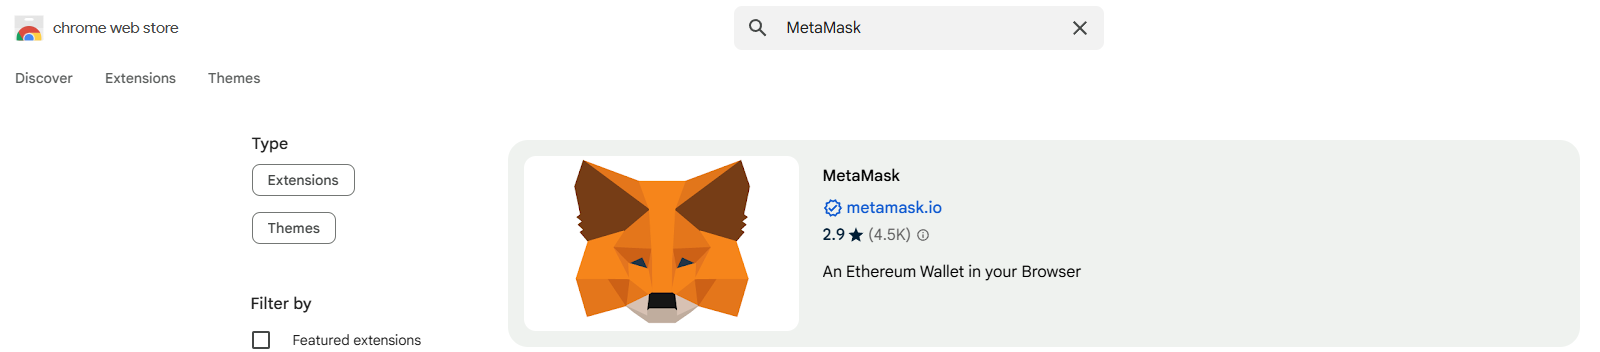
Go to the Google Chrome Web Store, search for MetaMask, and click Add to Chrome to install. Make sure to select the plugin with the blue verification badge to avoid scams.
1.1.2. Creating a Wallet
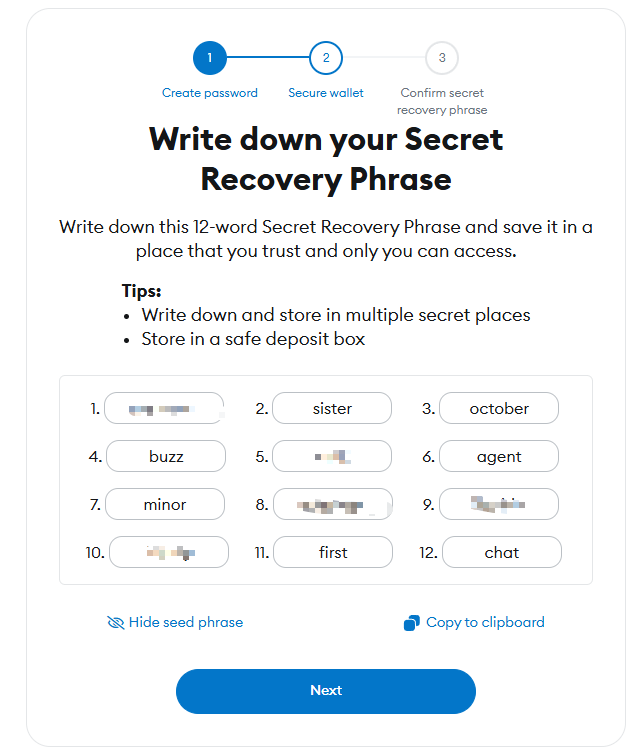
After installation, follow MetaMask’s setup process to create a new wallet. During the Secure your wallet step, make sure to back up your seed phrase (12 words) - this is the only way to recover your wallet. This is particularly important in production environments. Every blockchain user must understand that blockchain networks are decentralized with no central management authority - if you lose your seed phrase, your assets cannot be recovered. Developers should be especially aware of this and prioritize protecting user asset security.

1.1.3 Switching to Optimism Test Network
There are two ways to switch networks:
In MetaMask, click Ethereum Mainnet, select Add a custom network, and enter the Optimism test network information.
Use the one-click add tool on the OP browser website.
We’ll choose the second method as it’s simpler.
Visit the OP Sepolia Explorer, scroll to the bottom of the page, and click Add Optimism Sepolia Network.

During the process, the MetaMask plugin will be activated for the addition interaction.
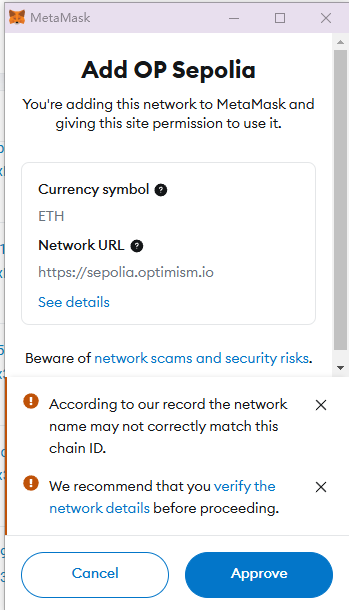
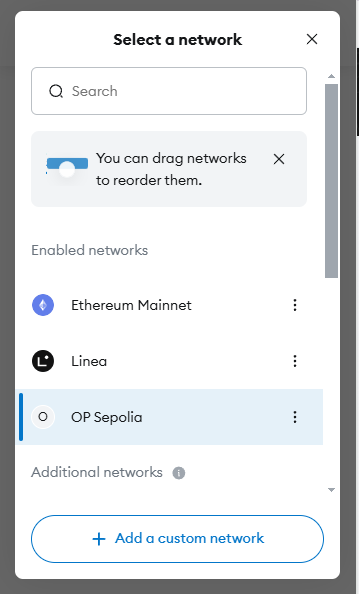
After adding, you’ll see the Op Sepolia test network in MetaMask.
1.2 Getting Test Tokens
In blockchain networks, we need a special currency to pay for our operations on the network. This currency is called Gas. In the Optimism network, we use ETH as Gas.
The main way to get test ETH is through faucets. You can Google search for Optimism Sepolia Testnet Faucet, find an available faucet, enter your wallet address, and click Get ETH to receive test ETH.
However, due to the blockchain industry’s popularity this year, faucets are being used more frequently, sometimes leading to unavailability or additional verification requirements, especially financial verification, making it harder to obtain test tokens. If you can’t find a suitable method, you can leave your email address & optimism sepolia testnet address in a Github Issue and mention that you need test tokens - we’ll provide you with 0.5 ETH test tokens as soon as possible.
2. Starting Development
After preparing the above, we can start development. This tutorial will guide you step-by-step to implement a simple function that can send a transaction to the Optimism network to call the sendHello contract interface. Then your Say Hello action will be permanently recorded on the blockchain. You can name the account address used in this transaction in the future. When you use the account address to call the whoami interface in the future, the contract will return your name.
As mentioned earlier, we can think of the blockchain network as a server. Our smart contract is a program on this server, and we can interact with this server through the interface of this program. Therefore, in game development, we need to develop two parts:
Frontend: We use the Godot engine to support the development of game interaction and game logic.
Smart contract (server program): We use the Solidity language to write smart contracts and deploy them to the blockchain network.
2.1. Creating a New Godot Project
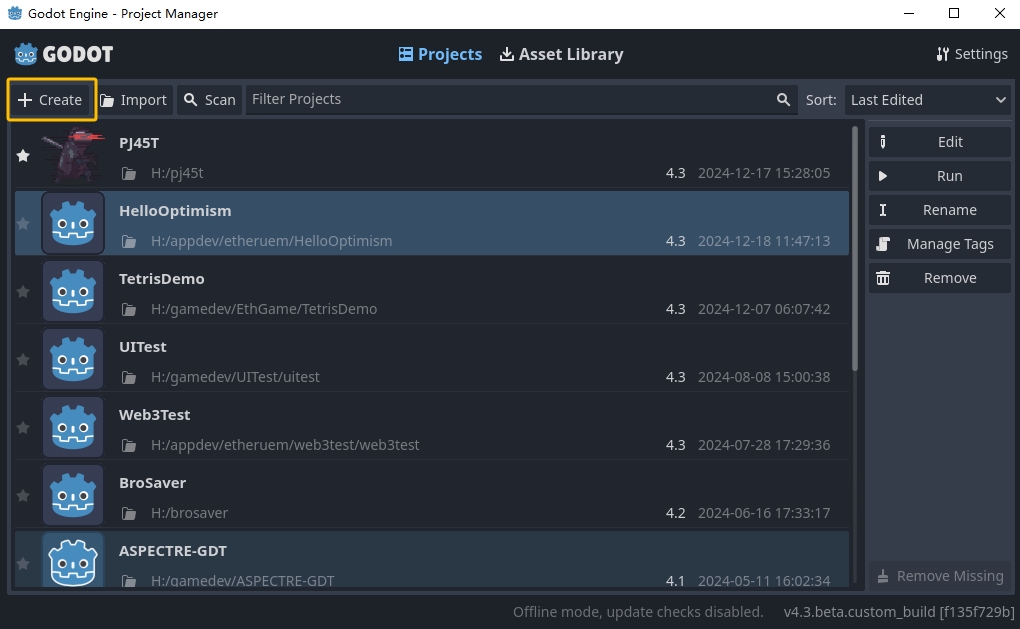
We start by creating a new Godot project. In your Godot Project Manager, click +Create button on the top left to create a new Godot Project.
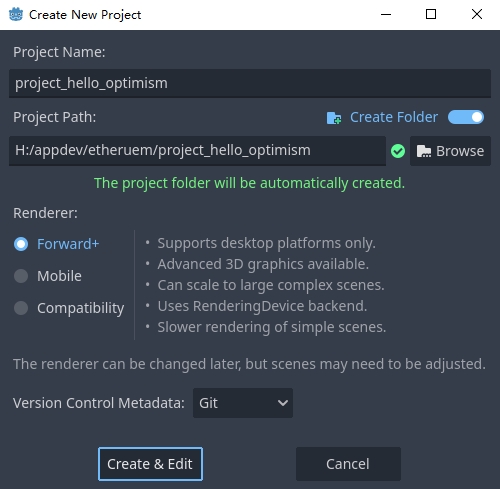
You can specify the project name and project path you prefer in the panel. By checking the Create Folder, the project will be placed in /path/project_name If not checked, the project will be created directly in /path. By clicking Create & Edit button on the bottom left, you will be able to enter and edit your newly created Godot project.
You can find more detail of setting up a new project in the official documentation: https://docs.godotengine.org/en/stable/getting_started/first_2d_game/01.project_setup.html
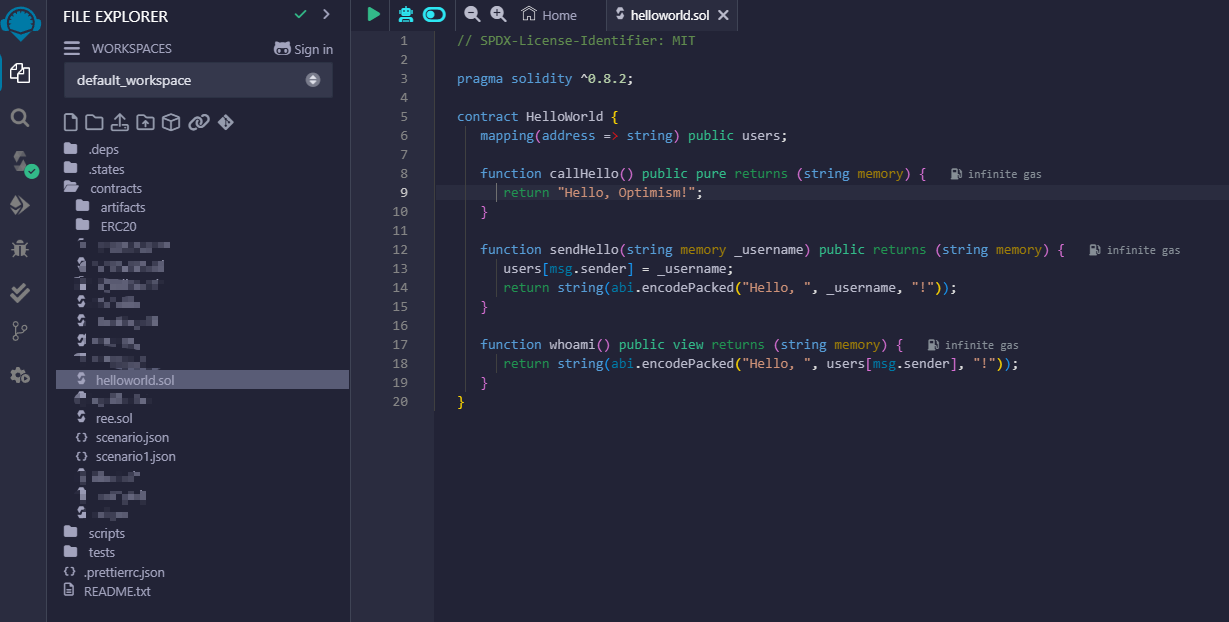
2.2. Writing Hello Optimism Smart Contracts
In the ETH ecosystem, most virtual machines are using EVM, and Optimism is no exception. Writing EVM smart contracts requires the use of the Solidity language (there are also other projects that can support the use of other languages to write EVM smart contracts, and readers who are interested can explore this aspect on their own).
Below is a simple HelloWorld smart contract. This contract has three interfaces:
// SPDX-License-Identifier: MIT

pragma solidity ^0.8.2;

contract HelloWorld {
   mapping(address => string) public users;

   function callHello() public pure returns (string memory) {
      return "Hello, Optimism!";
   }

   function sendHello(string memory _username) public returns (string memory) {
      users[msg.sender] = _username;
      return string(abi.encodePacked("Hello, ", _username, "!"));
   }

   function whoami() public view returns (string memory) {
      return string(abi.encodePacked("Hello, ", users[msg.sender], "!"));
   }
}
Among them:
callHello is a read-only interface that does not change the state of the contract and simply returns a string.
sendHello is a write interface that changes the state of the contract and binds the caller’s address and the username passed in.
whoami is a read-only interface that returns the username of the caller.
2.3. Compiling and Deploying Hello Optimism Smart Contracts
In the deployment of contracts, this tutorial uses Remix because it’s a very useful online IDE that helps with quick hands-on experience. Of course, you can also choose other development frameworks like Truffle, Hardhat, etc., which often have more powerful capabilities but require some time to learn. You can explore this aspect on your own in this tutorial.
Remix address: https://remix.ethereum.org/#lang=en&optimize=false&runs=200&evmVersion=null&version=soljson-v0.8.28+commit.7893614a.js
Open Remix, create a new file in the left file folder named HelloWorld.sol, and copy the above contract code into the file.
Then click Solidity Compiler to compile the contract.
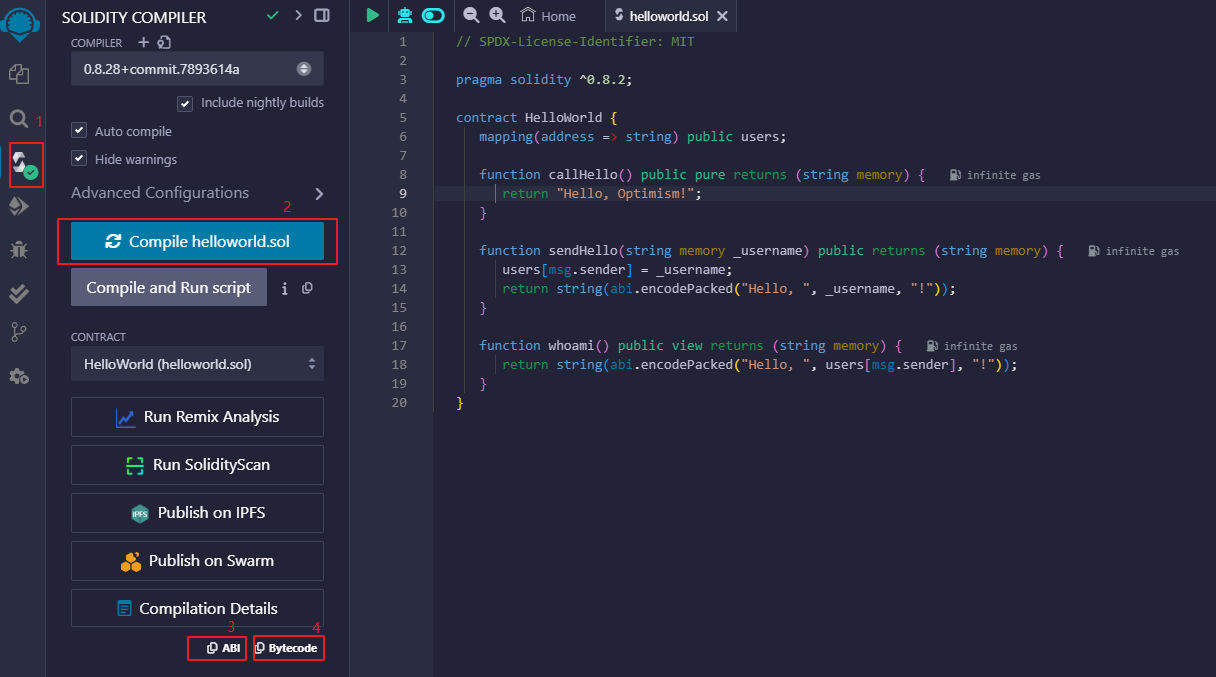
Note: After compiling, you can copy the ABI and Bytecode needed for subsequent GDScript code writing in the 3, 4 places in the figure.
Next, click Deploy & Run Transactions to deploy the contract. When deploying the contract, there are some options, including the Environment option. Selecting Remix VM(Cancun) will deploy the contract on a local environment built by Remix. Here we select the Injected Provider - Metamask option, so we can use metamask to deploy the contract. The contract will eventually be deployed to the network configured in the current metamask.
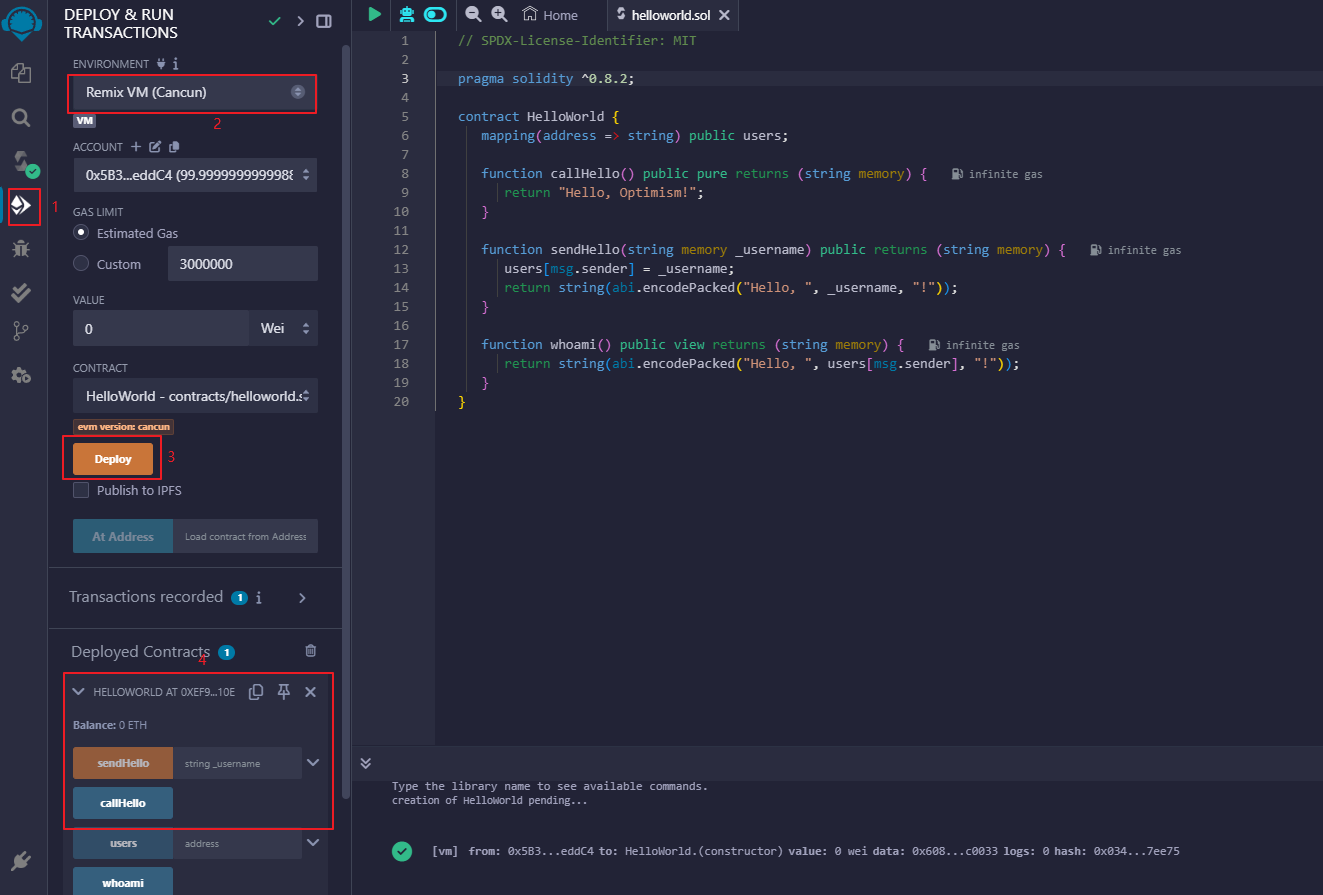
After deployment, we can see the deployed contract and its address in the Deployed Contractd column. We can also use its provided interaction interface to interact with the contract. When writing this tutorial, our contract was deployed to:
0x71b215024ed4d2603b654379809feabf726c66f0
You can view the information about this contract on the OP browser: https://sepolia-optimism.etherscan.io/address/0x71b215024ed4d2603b654379809feabf726c66f0
2.4. Using GDScript to Call Hello Optimism Smart Contracts
Next, we use GDScript to write code to call the deployed contract. We need the following four things to start deployment:
Contract Address: We get the contract address when we deploy the contract. This address is the unique identifier of the contract on the blockchain network.
Contract ABI: We get the ABI when we compile the contract. The ABI is a json format data that describes the interfaces of the contract.
Node RPC Request Address: When using the GDWeb3 module, we need a node RPC request address. This address is a node address that can access the blockchain network. You can quickly create an Endpoints on QuickNode and get this address. The RPC URL used in this tutorial is: https://snowy-capable-wave.optimism-sepolia.quiknode.pro/360d0830d495913ed76393730e16efb929d0f652
You can also use this address directly, but it’s not guaranteed to be available for a long time.
Private Key: The private key can be obtained by exporting the private key of the current account from metamask. Remember not to disclose your private key to others - this is a very dangerous behavior, as obtaining the private key means obtaining control of your account.
Next, we define these in GDScript.
const CONTRACT_ADDRESS := "0x71b215024ed4d2603b654379809feabf726c66f0"
const CONTRACT_ABI := """
[{"inputs":[{"internalType":"string","name":"_username","type":"string"}],"name":"sendHello","outputs":[{"internalType":"string","name":"","type":"string"}],"stateMutability":"nonpayable","type":"function"},{"inputs":[],"name":"callHello","outputs":[{"internalType":"string","name":"","type":"string"}],"stateMutability":"pure","type":"function"},{"inputs":[{"internalType":"address","name":"","type":"address"}],"name":"users","outputs":[{"internalType":"string","name":"","type":"string"}],"stateMutability":"view","type":"function"},{"inputs":[],"name":"whoami","outputs":[{"internalType":"string","name":"","type":"string"}],"stateMutability":"view","type":"function"}]
"""
const NODE_RPC_URL := "https://snowy-capable-wave.optimism-sepolia.quiknode.pro/360d0830d495913ed76393730e16efb929d0f652"
Now, we write code to call the sendHello contract interface:
func send_hello(username, prikey):
 # create a new instance of the ABIHelper class and unmarshal the ABI JSON string into it
 var h = ABIHelper.new()
 var res = h.unmarshal_from_json(CONTRACT_ABI)
 if !res:
     print("unmarshal_from_json failed!")
     return

 var params = [
     username,
 ]
 var packed = h.pack("sendHello", params)

 # get Optimism instance and set rpc url
 var op = Optimism.new()
 op.set_rpc_url(NODE_RPC_URL)
 var ethaccount_manager = EthAccountManager.new()
 var ethaccount = ethaccount_manager.from_private_key(prikey.hex_decode())
 #print("send eth account: %s" % [ethaccount.get_hex_address()])
 current_address = ethaccount.get_hex_address()
 op.set_eth_account(ethaccount)
 var transaction = {
     "to": CONTRACT_ADDRESS,
     "data": packed,
 }
 var signed_tx_data = op.sign_transaction(transaction)
 var rpc_result = op.send_transaction(signed_tx_data)
 print("rpc_result: ", rpc_result)
 # example rpc_result:  { "success": true, "errmsg": "", "txhash": "0xe3b18398db6371a47c1795f4a09ab412ddeceaa29ffda3d5dbae514a99e6caed" }
 if rpc_result["success"] == false:
     print("rpc reqeust failed! errmsg: ", rpc_result["errmsg"])
     return
 var tx_hash = rpc_result["txhash"]
 print("tx_hash: ", tx_hash)
 return tx_hash
For send_hello, we use the ABIHelper class to parse the ABI of the contract, then call the pack method to pack the call parameters, and finally use the private key to sign a transaction and call the send_transaction method to send the transaction to the blockchain network.
For transactions that modify the state of the contract, we need to pay a certain Gas fee. This Gas fee will be charged by the miners of the blockchain network for maintaining the operation of the network. The execution result of the contract will not be returned synchronously, but instead return a transaction hash. We can query the execution result of the transaction through this hash.
Next, we write code to call the whoami contract interface, which can simply query the execution result of sendHello by returning the username of the current address.
func whoami():
   # create a new instance of the ABIHelper class and unmarshal the ABI JSON string into it
   var h = ABIHelper.new()
   var res = h.unmarshal_from_json(CONTRACT_ABI)
   if !res:
      print("unmarshal_from_json failed!")
      return []

   var packed = h.pack("whoami", [])

   var op = Optimism.new()
   op.set_rpc_url(NODE_RPC_URL)
   var call_msg = {
      "from": current_address,
      "to": CONTRACT_ADDRESS,
      "input": "0x" + packed.hex_encode(),
   }
   var rpc_resp = op.call_contract(call_msg, "")
   print("gd: origin rpc_result: ", rpc_resp)
   print("gd: rpc_result: ", rpc_resp["response_body"])

   var call_result = JSON.parse_string(rpc_resp["response_body"])
   print("!!! result: %s" % [call_result])

   # create a new instance of the ABIHelper class and unmarshal the ABI JSON string into it
   var call_ret = call_result["result"]
   call_ret = call_ret.substr(2, call_ret.length() - 2)
   var result = []
   var err = h.unpack_into_array("callHello", call_ret.hex_decode(), result)
   if err != OK:
      assert(false, "unpack_into_dictionary failed!")
   print("call result: ", result)
   return result
Among them, current_address represents the account address currently used. This address is generated from the private key and can be used to query the username of the current account. In the example code, it’s a global variable.
2.5. Writing Game UI
We prepared a small demo to visualize the above functionality: https://github.com/qingfengzxr/HelloOptimism
Godot has a very powerful and easy-to-use UI system that allows you to build your Game UI fast and nicely.
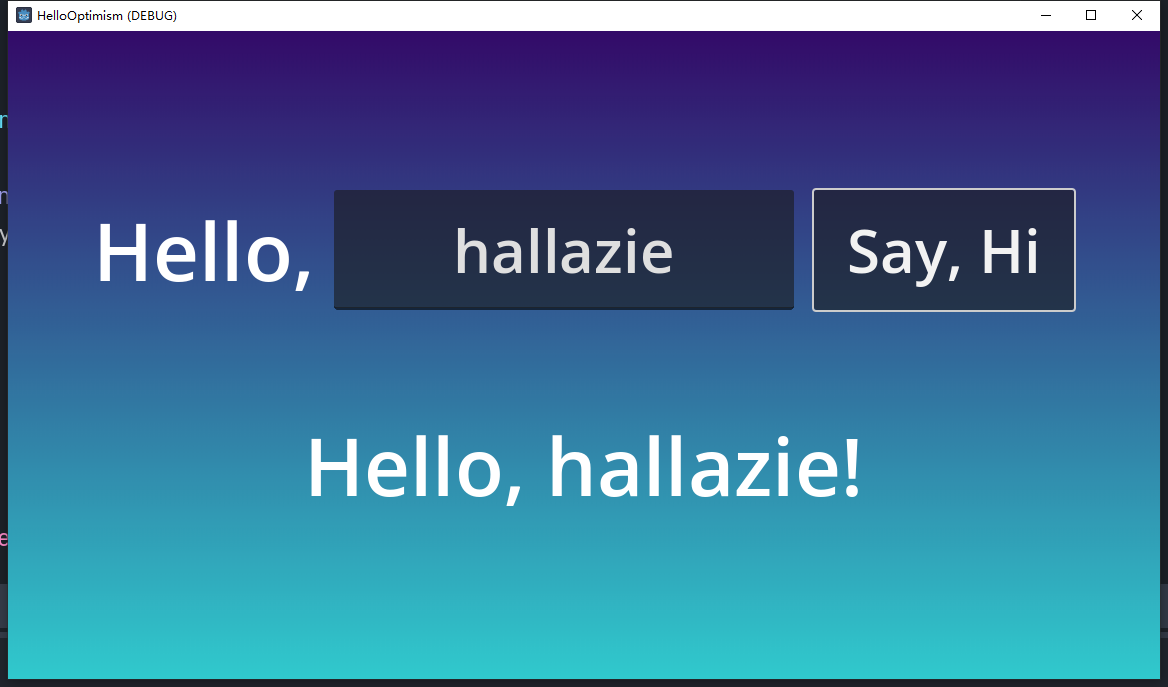
This demo include a LineEdit UI component to handle username input, a Button UI component to call callHello and sendHello functions, and a Label UI component to show the response from the chain. If username is empty, Button clicking will call callHello function in the contract, and return a default Hello, Optimism! from the contract. If username is set, Button clicking will call sendHello function in the contract first, with the transaction body containing your username and your privateKey. Then it will call whoami function to get the previously sent username from the contract with the address converted from the privateKey.
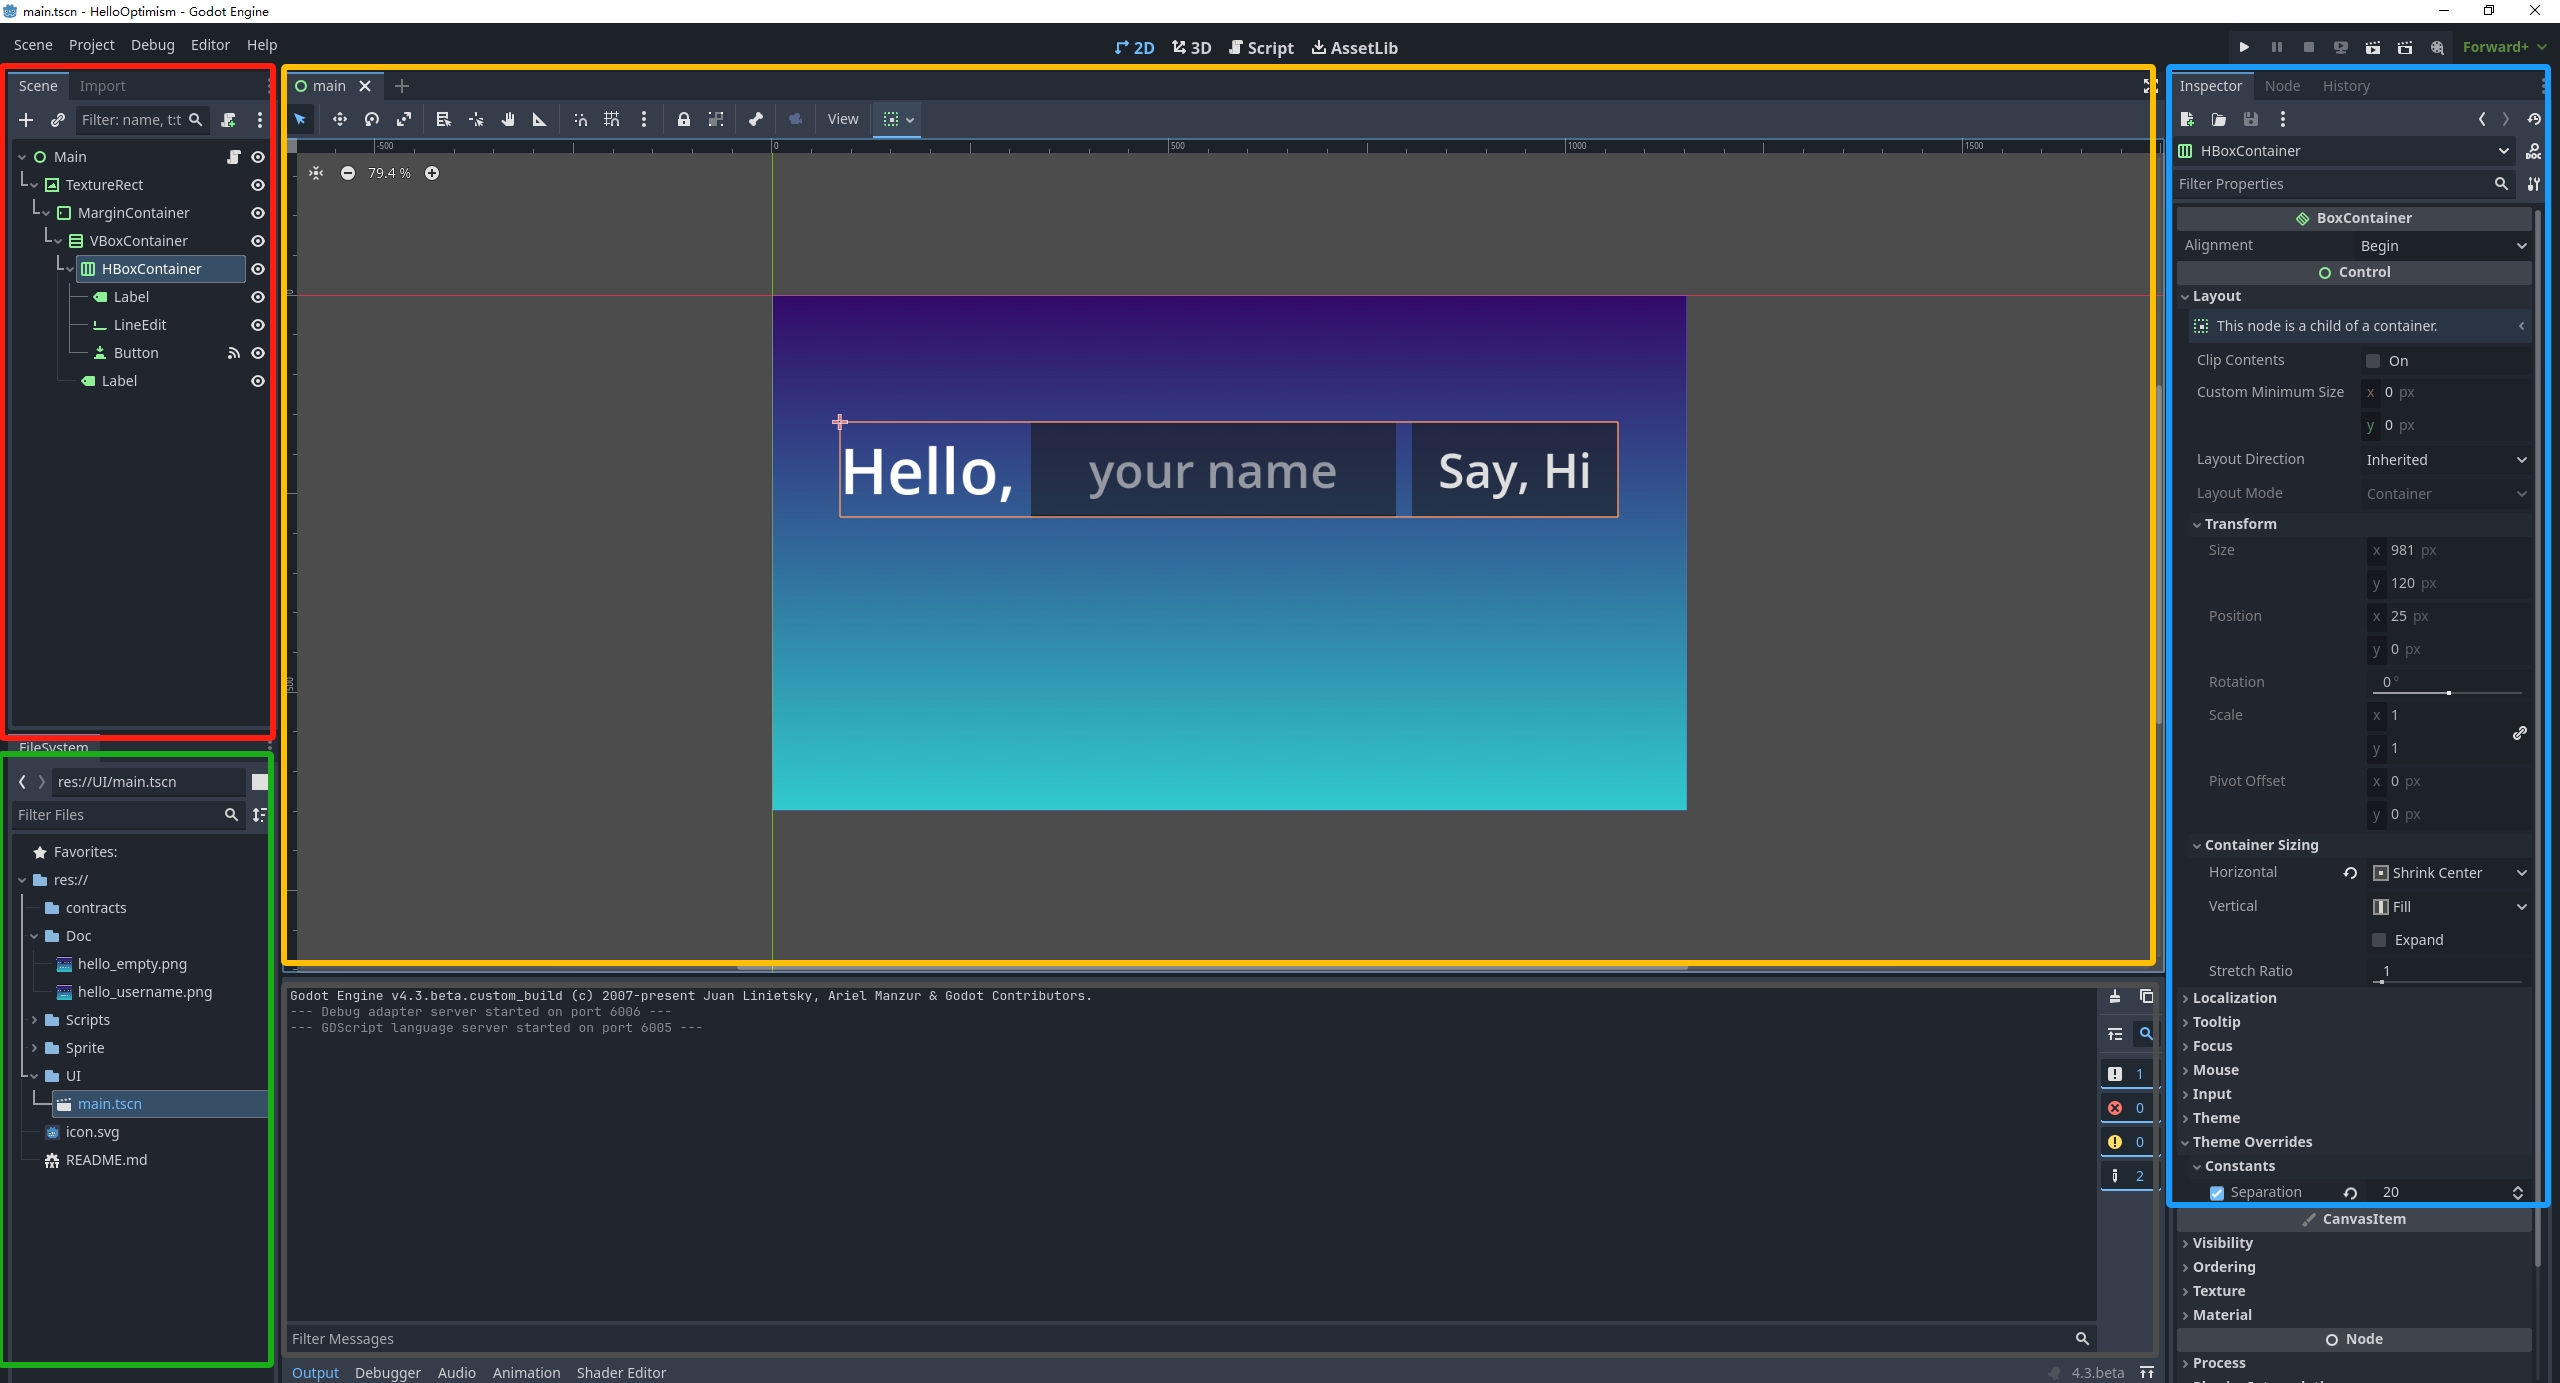
By default the editor window mainly contains 5 parts. The scene tree for currently opened node (in red box), the file browser for file management (in green box), the scene and script editor for managing current node hierarchy and coding with gdscript (in yellow box), the inspector for currently opened node (in blue box) and debugging console (in gray box).
This demo including only one node as the main UI scene and two gdscript files. The main.gd is used to control the actual UI, and the hello_optimism.gd is autoloaded as the static API for the simple contract.
Autoloaded script could be managed in Project -> Project Settings -> Globals -> Autoload. Once a script is set as autoloaded, it can be called without attaching to a instantiated node.

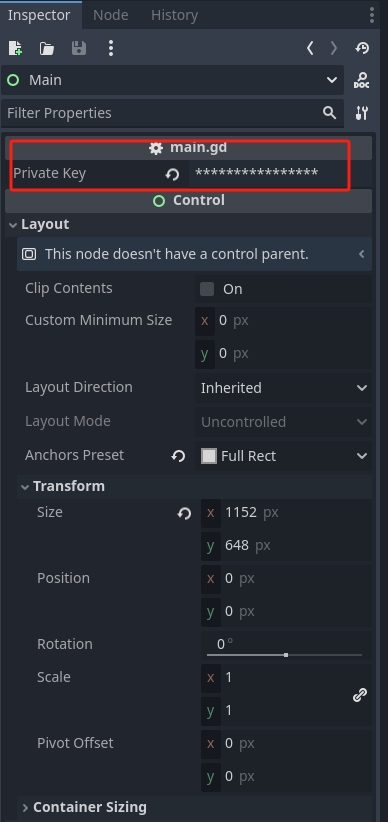
You can setup your privateKey at inspector of the main node attached with main.gd script with the Private Key variable. You can make a variable accessable in the inspector by adding @export decorator before the declaration of the variable.
@export var private_key: String = ""

func _on_button_pressed() -> void:
   pass
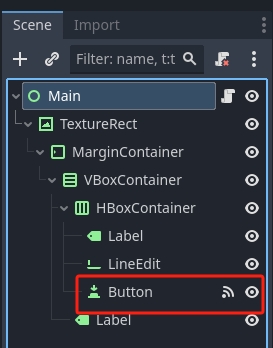
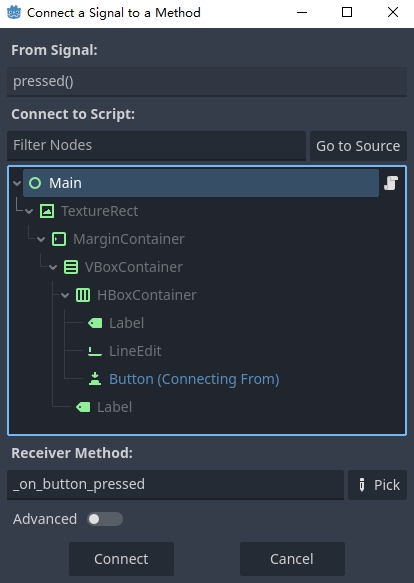
The Button submit event is passed to main.gd by connecting pressed event signal to _on_button_pressed function.
First select the Button node in the main node hierarchy
Then in the inspector, switch tab to Node to manage signals for current Button node. Double click the pressed signal.
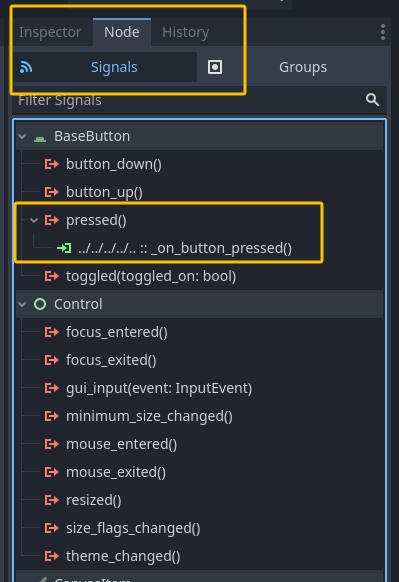
In the pop up panel, select the node containing the target function for connecting the signal. You can select any function in nodes in parent hierarchy as the slot as long it has a valid function signature.
The overall gdscript code for this Hello World demo is very simple and shown below. In this code which attached on root node of the main.tscn:
Use extends Control to inherit Godot’s built-in Control UI class.
Use $../.. to get a child node component with specific types as variables.
Use func _on_button_pressed as the event handler for the button click signal and process the main logic by interacting with GDWeb3 module.
extends Control

onready var line_edit: LineEdit = $TextureRect/MarginContainer/VBoxContainer/HBoxContainer/LineEdit
onready var say_hi: Button = $TextureRect/MarginContainer/VBoxContainer/HBoxContainer/Button
onready var show_hello: Label = $TextureRect/MarginContainer/VBoxContainer/Label

export var private_key: String = ""

func _on_button_pressed() -> void:
   var your_name = line_edit.text.strip_edges()
   print("the input name is: %s" % [your_name])
   if your_name.length() > 0:
      if private_key.length() > 0:
            var address = HelloOptimism.send_hello(your_name, private_key)
            print("return address is: %s" % [address])
            var send_hello_result = HelloOptimism.whoami()
            show_hello.text = send_hello_result[0]
      else:
            show_hello.text = "Please set privatekey first"
   else:
      var call_hello_result = HelloOptimism.callHello()
      print("call hello result: %s" % [call_hello_result])
      if call_hello_result.size() > 0:
            show_hello.text = call_hello_result[0]
      else:
            show_hello.text = "Something went wrong, please check console"
2.6. Running the Game
To run the game, there are three methods on the top right of the editor to use: Run Project, Run Current Scene, Run Specific Scene. We highlight these methods in the red box in the following screenshot.
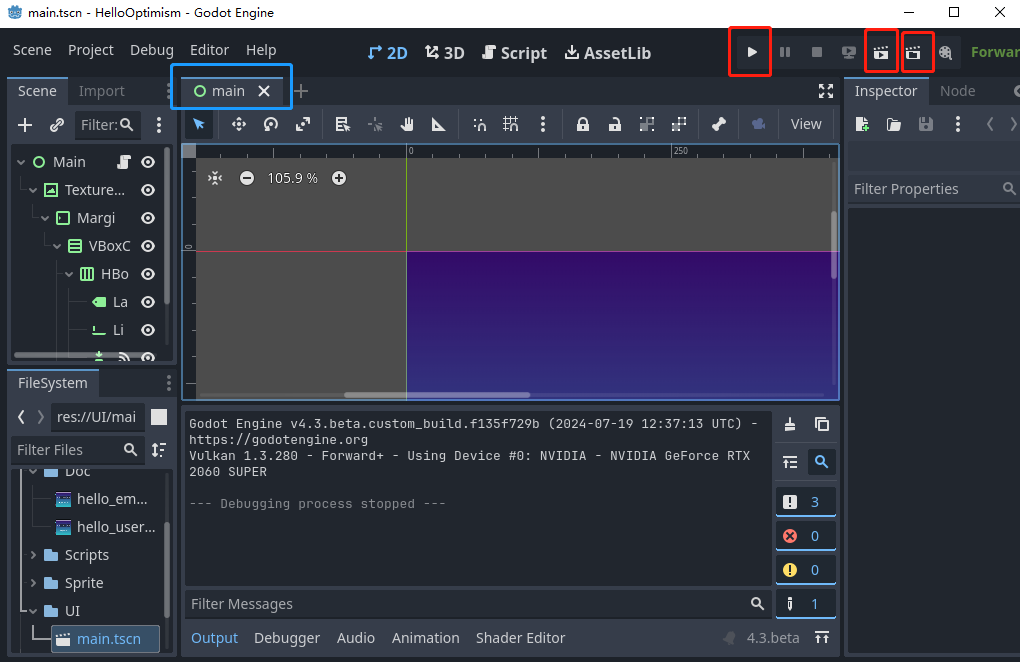
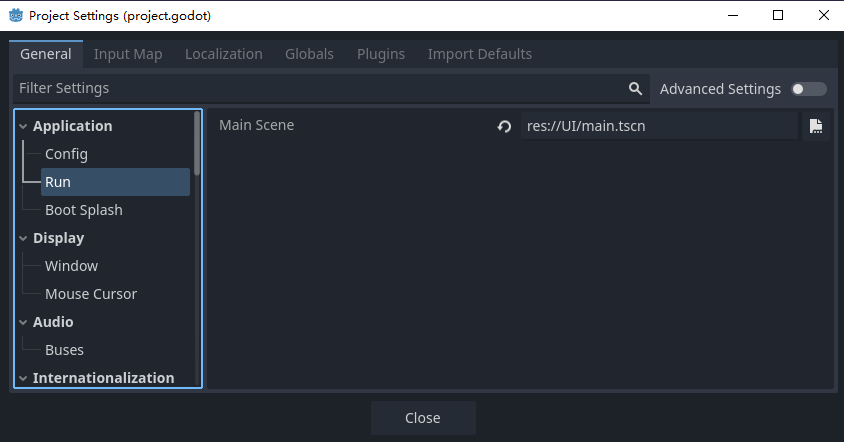
By clicking Run Project, you will start the default main scene set in project setting. You can set the default main scene in Project -> Project Setting -> Application -> Run -> Main Scene.
By clicking Run Current Scene, you will start the current selected scene tab as show in blue box in the previous screenshot.
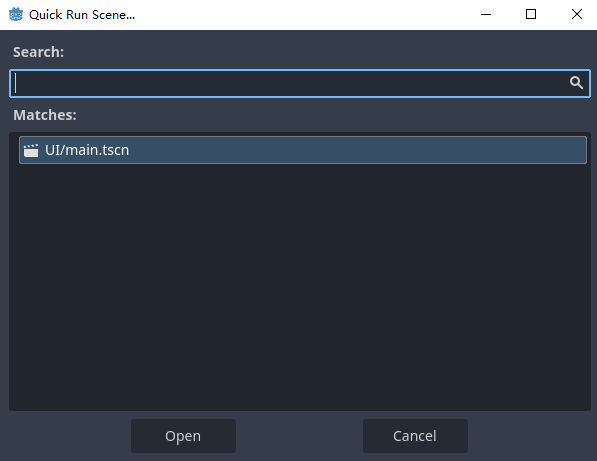
By clicking Run Specific Scene, Godot allows you to run any .tscn scene file. You can select a specific scene and click Open to start it.